File Server to OneDrive for Business Migration
OneDrive for Business is gaining recognition and traction among SMBs and enterprises. In particular, replacing user home drives, commonly stored on on-premises file shares, with OneDrive is becoming a common request to Office 365 system integrators and MSPs. As our partners have started to do more of these projects, some common roadblocks have become apparent:
- The structure of the File Servers is not in harmony with user names in Office 365.
- They do not want to migrate the complete File Servers structure.
- They are not aware of the limits in OneDrive for Business.
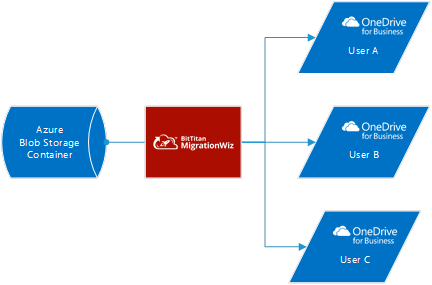
Follow these easy steps to migrate home drives to OneDrive with MigrationWiz:
Step 1: Upload the files into an Azure Blob storage.
Step 2: Create a Project in MigrationWiz: Source is Azure, Destination is OneDrive for Business.
Step 3: Filter the different Folders to migrate only the relevant data to the users’ OneDrive for Business.
Before you begin to upload, you must check all documents, determine if any limitation prevents these documents from being stored in OneDrive for Business. There are several articles about these limitations:
Restrictions and limitations …. sync SharePoint libraries to your computer through OneDrive for Business
Migrating File Shares to OneDrive for Business
SharePoint Online and OneDrive for Business: software boundaries and limits
So then you are able to identify the folders:
In the following example we only want to upload only 3002 and 3003 == User A and User B
| File Server structure | Azure Blob container (after uploading) |
| FS3001 | |
| FS3001doc1.docx | |
| FS3002 | FS3002 |
| FS3002Doc21.docx | FS3002Doc21.docx |
| FS3002Doc22.docx | FS3002Doc22.docx |
| FS3003 | FS3003 |
| FS3003Subfolder1 | FS3003Subfolder1 |
| FS3003Subfolder1Doc31.docx | FS3003Subfolder1Doc31.docx |
| FS3003doc32.docx | FS3003doc32.docx |
| FS3003doc33.docx | FS3003doc33.docx |
| FS3004 | |
| FS3004doc41.docx | |
| FS3005 | |
| … | Directory.metadata |
| File.metadata |
Only the folders and files (these are highlighted in yellow) should be uploaded to the Azure blob in the named container.
The Second part is the migration with MigrationWiz
The table below indicates what will be migrated into the OneDrive for Business document library destination:
| User A | User B |
| Doc21.docx | doc32.docx |
| Doc22.docx | doc33.docx |
| Subfolder1 | |
| Subfolder1Doc31.docx |
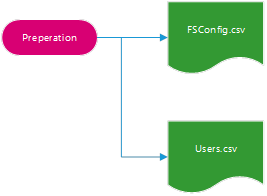
So this can be done, using two CSV files and also two PowerShell cmdlets.
The first CSV file is the configuration file where several kinds of information will be stored:
| FSConfig.csv | ProjectName | The Project Name in MigrationWiz. |
| ContainerName | The container name of the blob storage in Azure. The container in this Azure blob storage must exist. (Only lowercase names are allowed) | |
| RootPath | The root path of the File Server. | |
| AccessKey | The name of the Azure Blob storage. | |
| SecretKey | The Security Key to access the Blob storage. | |
| ODFBAdmin | The email of the Office 365 Global administrator. | |
| Password | The Password of the Office 365 Global administrator. |
In the second CSV file are stored users’ name and the corresponding File Server folder. Additionally, the Filter Folder and Folder Mapping must be saved.
| Users.csv | DestinationEMail | Email address of the user, in which the ODFB data is stored. |
| SourceFolder | The Subfolder of the File Server, which is mapped with the email address (User) | |
| FilterFolder | The RegEx for the User, which filters only the Subfolder and for the given user. | |
| FolderMapping | Filters the Folder. |

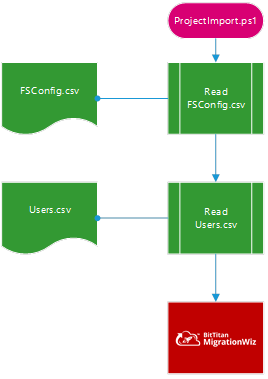
If all data are saved in both CSV files, then we may execute the first PowerShell cmdlet with the name Uploader.ps1.
Now only the selected folders, subfolders and files are uploaded to the Azure Blob storage in the named container.

The second PowerShell cmdlet ProjectImport.ps1 creates the complete Project in MigrationWiz. You do not have to set any information. All information about the project (Source, Destination, container) and all users are inserted. If you have upcoming File Server migration projects, Contact Us. We can provide you with the supporting PowerShell scripts and CSV files that are referred to in this blog post.

And now you are ready to start the Full Migration.

At BitTitan we’ve been empowering IT service professionals to successfully deploy and manage cloud technologies through automation for over a decade. Sign up for a FREE BitTitan account today to access our products and services.


